How to Manually Install a Yoho Mobile eSIM | No QR Code
So you’re ready for your trip, you’ve purchased your Yoho Mobile eSIM, but something’s gone wrong—the QR code won’t scan. Maybe your phone’s camera is damaged, the code isn’t displaying properly, or you simply prefer a more hands-on approach. Don’t worry, you can still get connected in minutes.
Manual eSIM installation is a reliable and straightforward backup method that puts you in control. This guide will walk you through the simple steps for both iOS and Android devices, ensuring you can activate your data plan without a hitch. Ready to get connected? Explore our flexible eSIM plans today!
Why You Might Need to Install an eSIM Manually
While QR codes are convenient, they aren’t foolproof. There are several common scenarios where knowing how to install an eSIM manually comes in handy:
- Camera Issues: A cracked or malfunctioning camera can make scanning impossible.
- Email or Display Problems: The email containing the QR code might be inaccessible, or the code itself could be blurry or improperly formatted on the screen you’re viewing it on.
- No Second Screen: You might not have another device to display the QR code for your phone to scan.
- Personal Preference: Some tech-savvy users simply prefer the control of entering the activation details themselves.
Whatever the reason, the manual method ensures you always have a way to activate your eSIM.
Before You Begin: What You’ll Need
To ensure a smooth manual setup, gather these three things first:
- A Stable Wi-Fi Connection: Your phone needs internet access to download and activate the eSIM profile.
- An eSIM-Compatible Device: Make sure your smartphone supports eSIM technology. You can check our up-to-date eSIM compatible device list to confirm.
- Your Manual Activation Details: After your purchase, Yoho Mobile will provide you with the necessary information. You’ll need the SM-DP+ Address and the Activation Code. Keep them handy.
How to Manually Install Your Yoho Mobile eSIM on iOS (iPhone)
For iOS users, Yoho Mobile offers an incredibly simple one-click installation directly from our app or website after purchase. In most cases, you just tap ‘Install,’ and your iPhone handles the rest. However, if you need the manual method as a backup, the process is still very easy.
Step-by-Step Guide for iPhone:
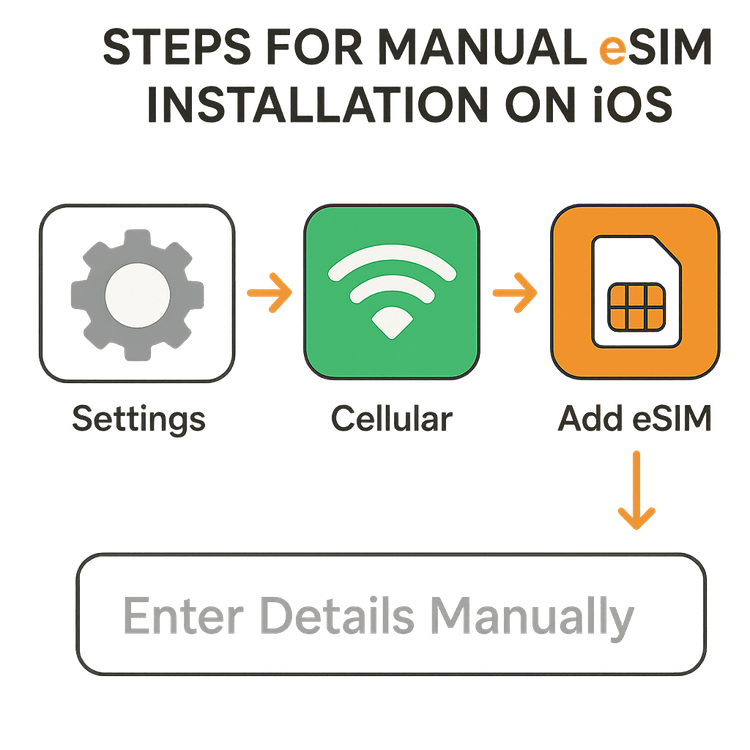
- Go to Settings on your iPhone.
- Tap on Cellular (or Mobile Data).
- Select Add eSIM.
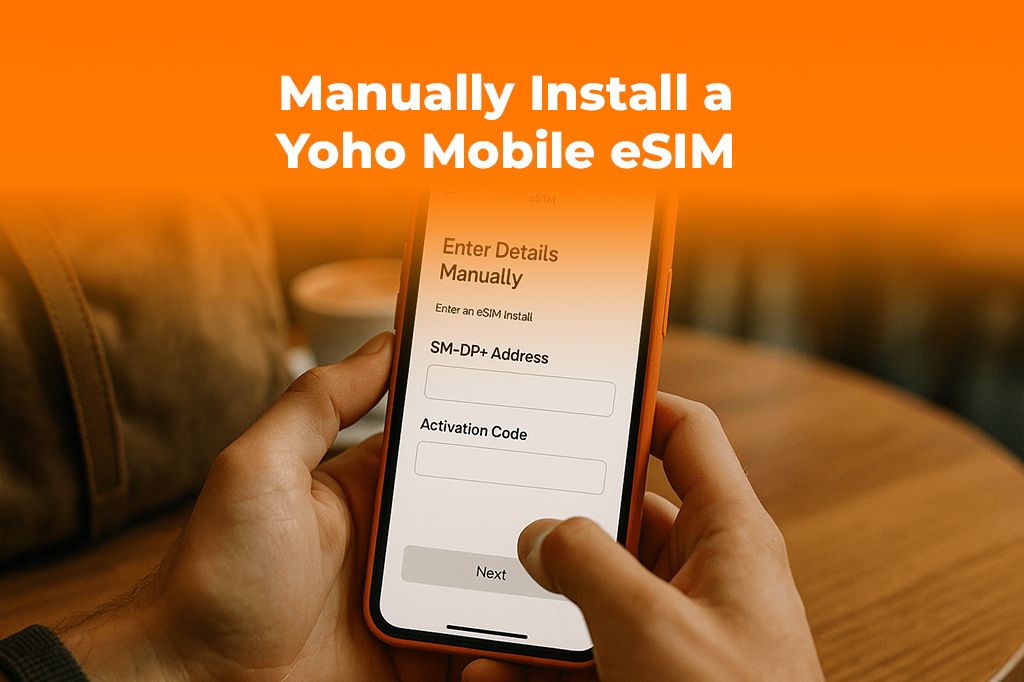
- On the next screen, instead of scanning the QR code, tap Enter Details Manually at the bottom.
- Carefully copy and paste the SM-DP+ Address and Activation Code from your Yoho Mobile installation email into the corresponding fields.
- Tap Next and follow the on-screen prompts to complete the activation.
- You can then label your new eSIM (e.g., “Yoho Travel”) to easily distinguish it from your primary SIM.
For more detailed information on eSIMs, you can refer to Apple’s official support page.
How to Manually Install Your Yoho Mobile eSIM on Android
The manual setup process for Android devices, like Samsung Galaxy or Google Pixel, is just as straightforward. The exact menu names might vary slightly depending on your phone’s manufacturer and Android version, but the core steps remain the same.
Step-by-Step Guide for Android:
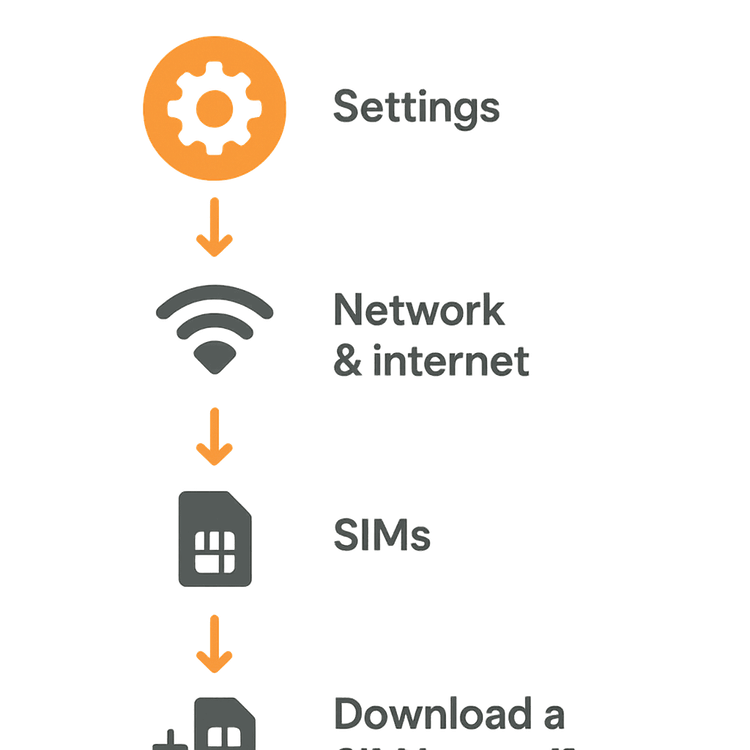
- Go to Settings on your Android device.
- Tap on Network & internet, then select SIMs.
- Tap Add eSIM or Download a SIM instead?.
- When prompted to scan a QR code, look for an option that says Need help? or Enter code manually.
- Tap it, and you’ll be asked to enter an activation code. This is where you’ll input the full string provided by Yoho Mobile (which includes the SM-DP+ Address and Activation Code in a single format like LPA:1$smdp.io$04829…).
- Carefully copy and paste the code and tap Continue.
- Follow the prompts to download and install your eSIM profile. Once complete, you can enable it for mobile data.
If you need more help, Google provides general guidance on their support site.
After Installation: Final Steps for Seamless Connectivity
Once your Yoho Mobile eSIM is installed, there are just a couple of final checks to ensure everything is working perfectly for your travels in destinations like the United States or across Asia.
- Turn on Data Roaming: Go to your phone’s cellular settings, select your Yoho eSIM, and make sure the Data Roaming toggle is turned ON. This is essential for your eSIM to connect to local networks abroad.
- Select for Mobile Data: Ensure your phone is set to use the Yoho eSIM for mobile data.
- Check Your Connection: You should see the new network signal appear on your status bar. Try opening a web page to confirm your internet is working.
Frequently Asked Questions (FAQ)
Q1: Where can I find my manual eSIM activation details for Yoho Mobile?
Your SM-DP+ Address and Activation Code are provided in the confirmation email and on your account page on the Yoho Mobile website immediately after you complete your purchase. Always check there first.
Q2: What is an SM-DP+ Address and why do I need it for manual setup?
The SM-DP+ (Subscription Manager - Data Preparation) Address is a unique server address that tells your phone where to securely download the eSIM profile from. It works together with the Activation Code to ensure the correct eSIM is installed on your device.
Q3: Can I reuse the manual installation details if I delete my eSIM profile?
No. For security reasons, an eSIM profile and its activation code are typically for one-time use. Once an eSIM is installed and then deleted, you cannot reinstall it using the same details. You would need to purchase a new plan.
Q4: What should I do if my manual eSIM installation is stuck on “Activating”?
First, ensure you have a stable Wi-Fi connection. If it’s still stuck after a few minutes, try restarting your phone. This often resolves minor activation glitches. If the problem persists, contact our support team for immediate assistance.
Conclusion: Stay Connected, No Matter What
Facing a non-scannable QR code doesn’t have to be a travel-day disaster. With the manual installation method, you have a reliable and powerful way to activate your Yoho Mobile eSIM and get online. By following these simple steps, you can ensure your trip starts smoothly, with seamless data connectivity right at your fingertips.
At Yoho Mobile, we’re dedicated to providing a hassle-free experience. And with added protections like Yoho Care, you can travel with the peace of mind that you’ll never be left disconnected, even if you run out of data. Get your Yoho Mobile eSIM now and experience the future of travel connectivity.
更多精选旅行提示
How to Install and Activate Your Yoho eSIM on iPhone
阅读全文TroubleshootingHow to Install and Activate Your Yoho eSIM on Android
阅读全文TroubleshootingeSIM Not Working? Your 2025 Troubleshooting Guide to Fix It Fast
阅读全文eSIM compatible devicesIs Your Phone eSIM Compatible? Check the 2025 Yoho Mobile List
阅读全文TutorialsHow to Manually Top Up Yoho eSIM & Use Yoho Care | 2025 Guide
阅读全文