How to Manually Install Your Yoho Mobile eSIM (No QR Code)
Excited for your trip, you’ve purchased your Yoho Mobile eSIM, but the QR code just won’t scan. Don’t worry, this is a common hiccup with a very simple solution. Whether your camera is acting up, you didn’t receive the email, or the code is unreadable, you can still get connected in minutes using manual installation.
This guide will walk you through the exact steps to manually install your eSIM on both iOS and Android devices. No camera needed! If you’re new to eSIMs and want to see how easy it is, why not try our risk-free eSIM trial first?

When Should You Use Manual Installation?
While QR codes are convenient, manual installation is your reliable backup plan. You should use it if:
- Your phone’s camera is broken or can’t focus on the QR code.
- You haven’t received the QR code email or can’t access it on another device to scan.
- The QR code image is blurry or distorted.
- You simply prefer to enter the details by hand.
Before You Begin: What You’ll Need
To successfully install your eSIM manually, you’ll need three things. You can find this information in your purchase confirmation email from Yoho Mobile or within the app under your eSIM details.
- A stable Wi-Fi connection: Your phone needs internet access to download and activate the eSIM profile.
- SM-DP+ Address: This is a unique server address that tells your phone where to find your eSIM profile.
- Activation Code: This is a unique code that, along with the SM-DP+ Address, authorizes the installation.
Keep these details handy—you’ll need to copy and paste them into your phone’s settings.
How to Manually Install Your eSIM on iOS (iPhone)
For most iOS users, installing your Yoho Mobile eSIM is even easier than manual setup! After purchase, simply go to the Yoho Mobile app or your confirmation email and tap the ‘Install’ button. This will automatically guide you through the setup in under a minute—no codes or QR scans needed.
However, if that method isn’t working or you need to do it manually, here’s how to enter the eSIM details yourself.
- Go to Settings > Cellular (or Mobile Data).
- Tap Add eSIM.
- On the ‘Set Up Cellular’ screen, tap Use QR Code at the bottom.
- Don’t worry, you won’t need your camera. On the next screen, tap Enter Details Manually.

- Carefully copy and paste your SM-DP+ Address and Activation Code into the corresponding fields.
- Tap Next and follow the on-screen prompts to complete the activation.
How to Manually Add an eSIM Profile on Android
Android devices also provide a straightforward way to add an eSIM profile without a QR code. The exact steps might vary slightly depending on your phone’s manufacturer (e.g., Samsung, Google Pixel), but the process is generally the same.
- Go to Settings > Network & internet (or Connections).
- Tap SIMs (or SIM card manager), then tap the + or Add eSIM button.
- Your phone will search for eSIMs. Select the option that says Need help? or Enter activation code.
- Tap Enter it manually.
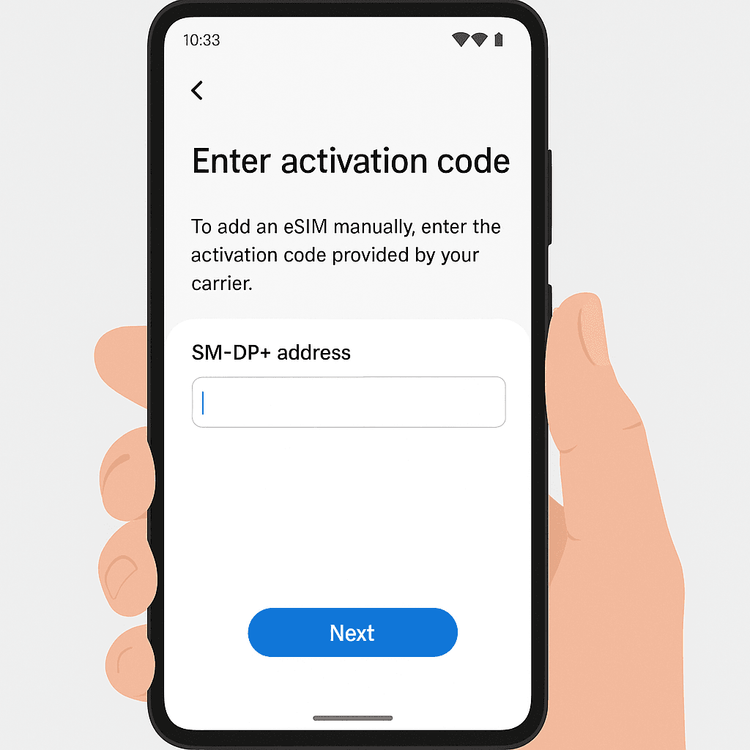
- You will be prompted to enter the code. Copy and paste your Activation Code (sometimes called SM-DP+ Address or similar on Android) into the field.
- Tap Continue and follow the instructions to download and install your eSIM.
Finalizing Your Setup
Once your eSIM is installed, there are a couple of final steps to ensure it works perfectly abroad:
- Label Your eSIM: Go into your cellular settings and give your new eSIM a custom label, like “Yoho Travel” or “Europe Data.” This helps you easily switch between your primary and travel SIMs.
- Turn On Data Roaming: For your Yoho Mobile eSIM to connect to local networks, you must enable Data Roaming for it in your phone’s settings.
- Set for Cellular Data: Make sure you select your Yoho Mobile eSIM as the default line for Cellular Data.
Still facing issues? Double-check that your device is on our eSIM compatible device list and contact our support team for help. Once connected, you can travel with peace of mind, especially with the protection of Yoho Care, which keeps you connected even if your data runs out.
Frequently Asked Questions (FAQ)
1. What is an SM-DP+ Address?
The SM-DP+ (Subscription Manager - Data Preparation) Address is a secure server address where your eSIM profile is stored. Your phone uses this address to securely download and install the eSIM onto your device. It’s a key piece of information for manual eSIM installation.
2. What should I do if my eSIM QR code doesn’t work and manual installation also fails?
First, double-check that you’ve correctly copied and pasted the SM-DP+ Address and Activation Code without any extra spaces. Ensure you have a strong Wi-Fi connection. If it still fails, please contact Yoho Mobile support immediately. Our team is available 24/7 to help troubleshoot any connectivity issues.
3. Can I reuse the activation code if I delete the eSIM by mistake?
No. For security reasons, an eSIM activation code is for one-time use only. Once an eSIM profile is installed and then deleted, the same code cannot be used to reinstall it. You would need to purchase a new plan to get a new eSIM profile. So, be careful not to delete your active eSIM during your trip!
4. Where do I find my manual installation details?
You will find your SM-DP+ Address and Activation Code in the purchase confirmation email sent to you after buying your plan. You can also typically find these details within the Yoho Mobile app by navigating to the specific eSIM plan you purchased.
Conclusion
A non-working QR code doesn’t have to derail your travel plans. Manual eSIM installation is a simple and reliable alternative that ensures you can get connected no matter what. By following these steps for your iPhone or Android device, you can activate your Yoho Mobile plan in minutes and start your journey with seamless internet access.
Ready to get connected for your next adventure? Explore Yoho Mobile’s flexible and affordable eSIM plans today!
เคล็ดลับการเดินทางที่คัดสรรมาเพิ่มเติม
Stuck with an eSIM Not Working? Here’s How to Fix It
อ่านเพิ่มเติมTroubleshootingHow to Install and Activate Your Yoho eSIM on iPhone
อ่านเพิ่มเติมTroubleshootingHow to Install and Activate Your Yoho eSIM on Android
อ่านเพิ่มเติมTroubleshootingeSIM Stuck on Activating? Quick Fixes for Yoho Mobile Users
อ่านเพิ่มเติม