eSIMに名前(ラベル)を付ける方法:iPhone & Android向けの簡単ガイド
人生で複数の役割をこなすだけでも十分に複雑です。それに加えて、スマホの通信設定で混乱を招くべきではありません。デュアルSIMとeSIM技術の力により、個人用、仕事用、海外旅行用と回線を分けて使うことが一般的になりました。しかし、「主回線」や「副回線」といった一般的なラベルに直面したとき、どちらがどちらなのかを素早く見分けるにはどうすればよいでしょうか?たった一度のタップミスが、仕事用の回線で個人的な電話をかけてしまったり、最悪の場合、予期せぬローミング料金を発生させてしまうことにもなりかねません。
解決策は驚くほどシンプルでありながら、非常に効果的です。それはeSIMにラベルを付けることです。この簡単なチュートリアルでは、iPhoneとAndroidの両方でSIMおよびeSIMプランに名前を付ける方法を紹介します。これは、デジタルライフの管理に絶大な明瞭さをもたらす小さな変更です。整理整頓の準備はできましたか?まずは、手間いらずの旅行用eSIMで接続してみましょう。今すぐ無料のeSIMトライアルをお試しください!

eSIMにラベルを付けることが画期的な理由
「方法」に飛び込む前に、「なぜ」について話しましょう。eSIMラベルのカスタマイズは、単に整理整頓のためだけではありません。管理、コスト削減、そして利便性のためです。これは、現代のすべてのユーザーにとって重要な旅行技術のハックです。
- 一目でわかる明瞭さ: 「モバイルデータ通信」と「旅行」の間で推測する代わりに、「個人用回線」や「Yoho - ヨーロッパ旅行」と表示されます。これにより、通話、テキスト、データのために回線を切り替える際に間違いがなくなります。
- 高額なミスの回避: 旅行用のeSIMに明確にラベルを付けることで、海外でのデータ通信にそのeSIMを使用し、国内プランを使っていないことを確実にします。これは、非常に高額になりがちな偶発的なデータローミング料金を防ぐ最も簡単な方法です。
- 簡単な管理: デジタルノマド、出張者、または複数の回線を管理するすべての人にとって、適切なラベリングはすべてを簡素化します。特定の連絡先に特定の回線を使用するように割り当てたり、デフォルトのデータ回線を迷うことなく数秒で切り替えたりできます。整理されたスマートフォンは効率的なスマートフォンです。
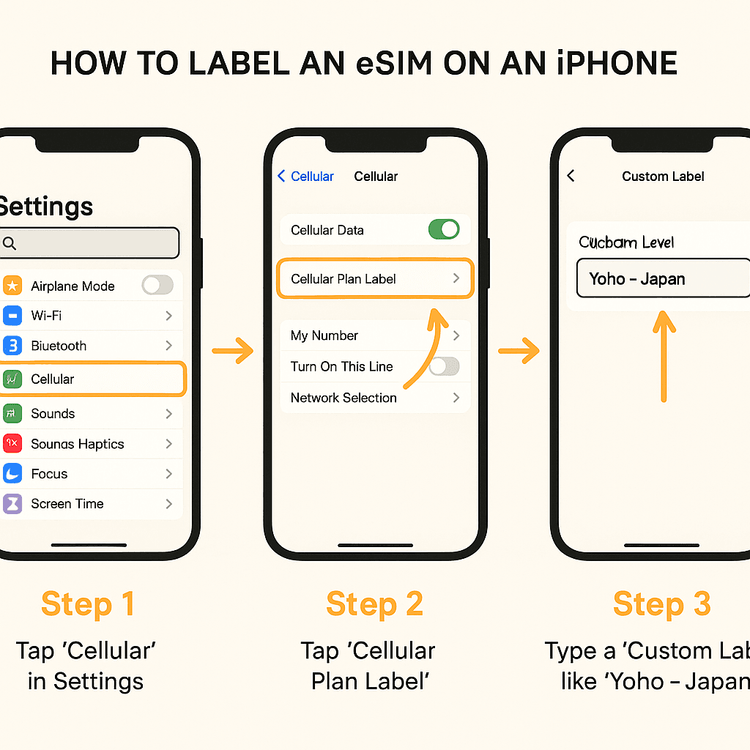
iPhone (iOS) でeSIMにラベルを付ける方法
Appleは、モバイル通信プランのラベルを非常に簡単にカスタマイズできるようにしています。iPhoneでeSIMの名前を変更する方法は次のとおりです。
- iPhoneで**「設定」**に移動します。
- **「モバイル通信」**をタップします。
- 「SIM」セクションで、名前を変更したいプランをタップします(デフォルト名が「ビジネス」や「旅行」であったり、単に通信事業者名が表示されている場合があります)。
- **「モバイル通信プランの名称」**をタップします。
- 「ビジネス」、「個人」、「旅行」などの定義済みラベルが表示された画面が表示されます。独自のラベルを作成するには、**「カスタム名称」**をタップします。
- 希望の名前(例:「Yoho - 日本」や「仕事用電話」)を入力し、**「完了」**をタップします。
- 以上です!新しいラベルが表示され、識別が容易になります。
新しいYoho Mobile eSIMを設定する場合、iOSユーザーは簡単です。購入後、アプリまたはメールの「インストール」ボタンをタップするだけで、1分以内にシステム設定がガイドされます。QRコードは不要です!その後、すぐにこれらの手順に従ってラベルを付けることができます。購入前には、いつでも当社のeSIM対応デバイスリストをチェックして、お使いのスマートフォンが対応しているかを確認できます。
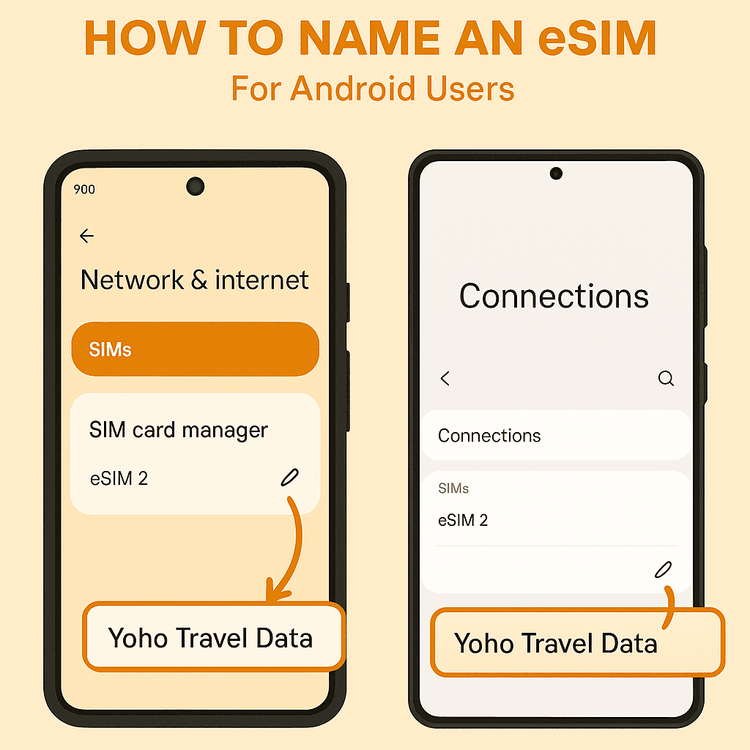
AndroidデバイスでeSIMに名前を付ける方法
AndroidでeSIMラベルをカスタマイズする手順も同様にシンプルですが、メニューの正確な名称はスマートフォンのメーカー(Samsung、Google Pixel、OnePlusなど)によって若干異なる場合があります。
一般的な手順は次のとおりです。
- Androidスマートフォンの**「設定」**アプリを開きます。
- 「ネットワークとインターネット」(Samsungデバイスでは「接続」)に移動します。
- **「SIM」または「SIMカードマネージャー」**をタップします。
- インストールされているSIMとeSIMのリストが表示されます。名前を変更したいものをタップします。
- **「名前」**というオプションまたは編集用の鉛筆アイコンを探します。
- 新しいカスタム名(例:「Yoho 旅行データ」や「個人回線」)を入力して保存します。
これで、クイック設定メニューを引き下げたり、データ設定を管理したりする際にカスタム名が表示され、デュアルSIMの整理が非常に簡単になります。お使いの特定のデバイスに関する詳細については、GoogleのPixelスマートフォン向けのような、メーカーの公式サポートページを参照してください。ラベル付けが完了すれば、世界中の旅行先での接続管理が簡単になります。次の冒険を計画していますか?190カ国以上で利用できるYoho Mobileの柔軟なデータプランをご覧ください。
eSIMの命名に関するベストプラクティス
ラベリングを最大限に活用するために、一貫した命名システムを考えましょう。以下にいくつかのアイデアを挙げます。
- 用途 + 目的地: 「Yoho - タイ旅行」、「仕事 - 米国会議」
- 目的: 「個人用 音声/テキスト」、「旅行用 データのみ」
- プロバイダー + 地域: 「Yoho Mobile - ヨーロッパ」、「AT&T - 自宅」
- シンプル&クリア: 「自分の番号」、「仕事用回線」、「旅行用eSIM」
複数のeSIMを整理する最善の方法は、あなたにとって最も意味のある方法です。目標は、一目でそれらを区別できるようにすることです。
よくある質問(FAQ)
Q1: eSIMの名前は何度でも変更できますか?
A: はい、iOSとAndroidの両方で、いつでもeSIMのラベルを変更できます。1つの旅行用eSIMを複数の旅行で使用する場合、新しい目的地に合わせて名前を変更するだけです。例えば、「Yoho - イタリア」から「Yoho - スペイン」のように。
Q2: eSIMのラベルを変更すると、サービスや電話番号に影響しますか?
A: まったく影響ありません。ラベリングは、純粋にデバイス上での整理目的のものです。通信プラン、電話番号、または通信事業者とのサービスの詳細を変更するものではありません。これは、お使いのスマートフォン上のローカルなニックネームにすぎません。
Q3: データ通信に使用するラベル付きeSIMを選択するにはどうすればよいですか?
A: スマートフォンの「モバイル通信」設定で、音声通話の「デフォルト回線」と「モバイルデータ通信」用の特定のSIMを選択できます。明確なラベルがあれば、着陸後すぐにデータ通信を「Yoho - 旅行用」eSIMに自信を持って切り替え、ローミング料金を回避できます。
Q4: 旅行用eSIMと国内プロバイダーのローミングプラン、どちらを使う方が良いですか?
A: Yoho Mobileのようなプロバイダーから提供される専用の旅行用eSIMは、従来のローミングプランよりもほとんどの場合、手頃で柔軟性があります。ローミングは予期せぬ請求につながる可能性がありますが、プリペイドの旅行用eSIMなら、固定価格で固定量のデータを利用できます。究極の安心のために、Yoho MobileではYoho Careも提供しており、予期せずデータがなくなっても接続を維持できるようにします。
まとめ
スマートフォンの設定を数回タップするだけで、わかりにくいモバイル通信プランのリストを、明確に整理されたシステムに変えることができます。少し時間をかけてeSIMにラベルを付けることで、時間を節約し、高額なローミングのミスを防ぎ、外出先での接続管理を完全にストレスフリーにすることができます。これは、よりスマートな旅行と、より整理されたデジタルライフに向けた、シンプルでありながら強力な一歩です。
これらのヒントを実践する準備はできましたか?今すぐYoho Mobile eSIMを入手し、次の目的地のためにラベルを付けて、シームレスで整理されたグローバルな接続性の未来を体験してください。