You’re all packed and ready for your trip. You’ve purchased your travel eSIM, but when you go to activate it, disaster strikes: the QR code won’t scan. Maybe your phone’s camera is cracked, the lighting is poor, or the code just isn’t cooperating. Don’t panic! A non-working QR code doesn’t mean you’re destined for a trip without data.
There’s a reliable backup method: manual installation. This guide will walk you through the simple steps to get your eSIM activated using your provider’s details, ensuring you stay connected no matter what. At Yoho Mobile, we design our services to be flexible for every situation. Before you dive in, why not explore our flexible eSIM plans that keep you in control?
Why Manual Installation is a Great Backup Plan
While QR codes are convenient, they aren’t foolproof. You might need to install your eSIM manually in several common scenarios:
- Damaged Camera: Your phone’s camera might be blurry, cracked, or simply not functioning, making it impossible to scan anything.
- Poor Scanning Conditions: Dim lighting or screen glare can prevent even a perfect camera from reading a QR code correctly.
- No Second Screen: If you receive the QR code in an email on the same device you’re activating, you can’t exactly scan it with the phone’s camera.
- Corrupted Code: In rare cases, the QR code image itself might be distorted or incomplete.
Knowing how to manually input the details is a fantastic skill for any tech-savvy traveler, turning a potential trip-ruiner into a minor hiccup.
What You’ll Need for Manual eSIM Installation
Before you begin, gather these three simple things to ensure a smooth process. It’s much easier than it sounds!
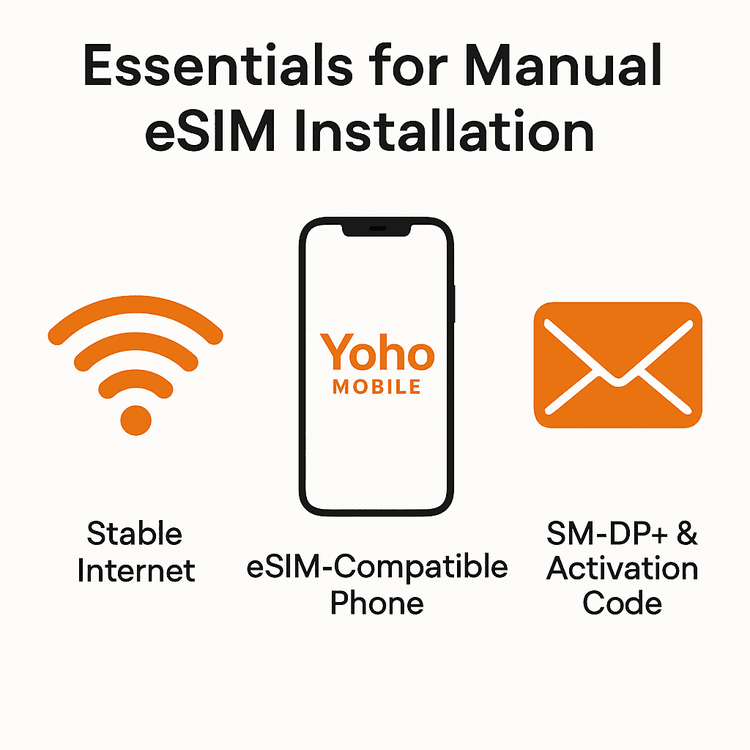
- A Stable Internet Connection: You’ll need Wi-Fi to download the eSIM profile to your device. We recommend doing this before you leave for the airport.
- An eSIM-Compatible Device: Make sure your smartphone or tablet supports eSIM technology. You can check our comprehensive eSIM-compatible device list to be sure.
- Your Activation Details: After your purchase from Yoho Mobile, you will receive an email containing two crucial pieces of information:
- SM-DP+ Address
- Activation Code
Keep this information handy. You’ll need to copy and paste it accurately.
Step-by-Step Guide: How to Manually Add Your eSIM
The process differs slightly between iOS and Android devices. Follow the steps for your specific phone.
The Backup Plan for iPhone Users
With Yoho Mobile, installing an eSIM on an iPhone is usually incredibly simple. After purchase, you can just tap the ‘Install’ button in our app or email, and your iPhone handles the rest. However, if that method fails or you prefer to do it yourself, here’s how to manually add a cellular plan on an iPhone with the SM-DP+ address:
- Go to Settings > Cellular (or Mobile Data).
- Tap Add eSIM.
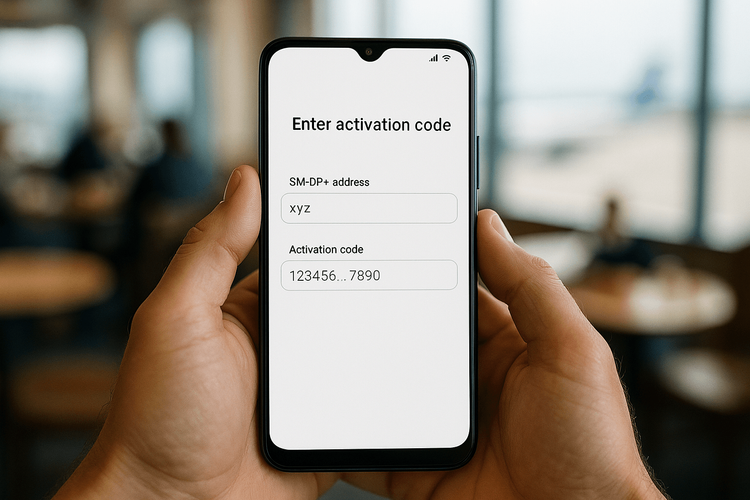
- At the bottom of the screen, select Use QR Code, and on the next screen, tap Enter Details Manually.
- You will see two fields: SM-DP+ Address and Activation Code.
- Carefully copy the SM-DP+ Address from your Yoho Mobile email and paste it into the corresponding field.
- Do the same for the Activation Code.
- Tap Next and follow the on-screen prompts to label your new eSIM (e.g., ‘Yoho Travel’) and complete the setup.
For more details, you can always refer to Apple’s official support page on eSIMs.
How to Install an eSIM Without a QR Code on Android
Android settings can vary slightly depending on the manufacturer (like Samsung or Google), but the general steps are very similar.
- Go to Settings > Network & internet > SIMs.
- Tap the + (plus) button to Add a network or Download a SIM instead.
- The camera will open to scan a QR code. Look for an option that says Need help? or Enter manually.
- Tap it, and you’ll be prompted to enter the activation code. Some phones, like Google Pixel, will ask for the SM-DP+ address after you enter the initial code. Just follow the prompts from your device.
- Copy and paste the Activation Code and SM-DP+ Address from your Yoho Mobile email.
- Tap Continue or Activate to download and install your eSIM profile.
If you need more help, Google’s support guide for Pixel phones is a useful resource.
Pro Tips for a Flawless Setup
To avoid any snags, keep these tips in mind:
- Check for Typos: Copy and paste the details directly to avoid errors. Extra spaces before or after the codes can cause the activation to fail.
- Stay on Wi-Fi: Do not disconnect from your Wi-Fi network until the eSIM profile has been fully downloaded and installed.
- Restart Your Device: If your eSIM is installed but not connecting to a network, a simple restart of your phone can often resolve the issue.
- Travel with Peace of Mind: Once you’re set up, you can travel worry-free. And with Yoho Mobile, you’re always covered. Even if you use up all your high-speed data, our Yoho Care service provides a basic connection so you can manually top up or contact support without being left stranded.
Frequently Asked Questions (FAQ)
What is an SM-DP+ Address?
The SM-DP+ (Subscription Manager - Data Preparation) Address is a unique server address that your phone connects to in order to securely download your eSIM profile. Think of it as the address where your digital SIM card ‘lives’ before you install it. This standard is defined by the GSMA, which ensures global compatibility.
Where do I find my eSIM activation code and SM-DP+ Address?
After you purchase an eSIM plan from Yoho Mobile, we will immediately send you a confirmation email. This email contains all the necessary details for activation, including the SM-DP+ Address and the Activation Code needed for manual installation.
Can I really install an eSIM if my phone camera is broken?
Yes, absolutely! The manual installation method described in this guide is the perfect solution if your camera is broken or unavailable. It bypasses the need for a camera entirely, relying only on the SM-DP+ address and activation code.
What should I do if the manual eSIM installation fails?
First, double-check that you’ve copied the SM-DP+ Address and Activation Code exactly, with no extra spaces. Ensure you are connected to a strong Wi-Fi network. If it still fails, restart your phone and try one more time. If the problem persists, our support team is available 24/7. Just visit our support page for assistance.
Conclusion: Stay Connected, No Matter What
A non-functional QR code doesn’t have to disrupt your travel plans. By following these simple manual installation steps, you can activate your eSIM and get online in minutes, whether you’re on an iPhone or Android. This powerful backup method ensures you’re always in control of your connectivity.
Ready to experience the freedom of hassle-free travel data? Try a free Yoho Mobile eSIM trial and see how easy global connection can be!