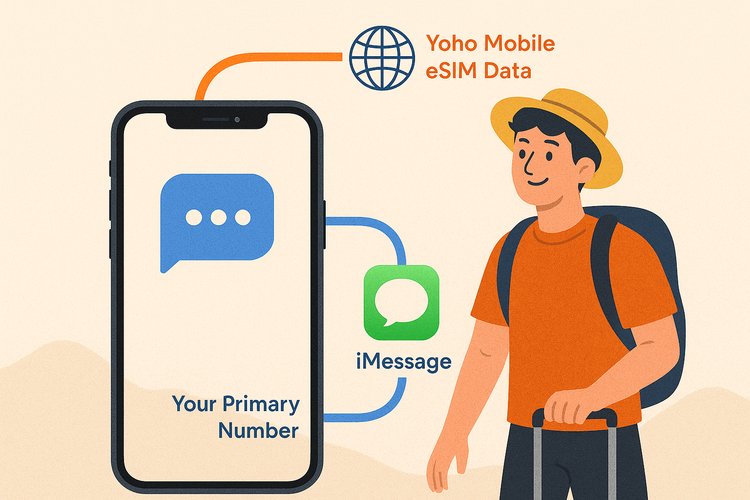
Keep Your Number for iMessage & FaceTime with a Travel eSIM
There’s nothing quite like the thrill of touching down in a new country. But that excitement can quickly fade when you’re hit with communication confusion. You’ve smartly installed a travel eSIM for affordable data, but suddenly your friends and family are getting iMessages from a strange, temporary phone number. It’s a common headache that can disrupt your group chats and cause unnecessary mix-ups.
Fortunately, there’s a simple fix. With the right settings on your iPhone, you can enjoy the cheap, fast data from your travel eSIM while ensuring your iMessage and FaceTime conversations continue to come from your trusted, primary phone number.
This guide will walk you through the exact steps to configure your iPhone for seamless travel communication. Get started with a flexible data plan from Yoho Mobile and follow this tutorial to set it up perfectly.
Understanding How iMessage Works with Dual SIM and eSIMs
Before diving into the settings, it’s helpful to understand what’s happening behind the scenes. iMessage and FaceTime aren’t just tied to your SIM card; they are linked directly to your Apple ID and the phone numbers you’ve registered with it.
When you activate a second line—like a Yoho Mobile travel eSIM—your iPhone has two active connections and needs to be told how to use them. It needs clear instructions on which line to use for three key functions:
- Default Voice Line: For making and receiving calls.
- iMessage & FaceTime: For your messaging and video call identity.
- Cellular Data: For internet access, maps, and apps.
The goal is simple: tell your iPhone to use your travel eSIM exclusively for cellular data while keeping your primary line as the default for everything else. This is the secret to maintaining your digital identity while avoiding hefty roaming fees.
The Pre-Travel Checklist: Setting Up Your iPhone
A few minutes of preparation before you leave can save you a lot of trouble later. Follow these steps before your trip begins.
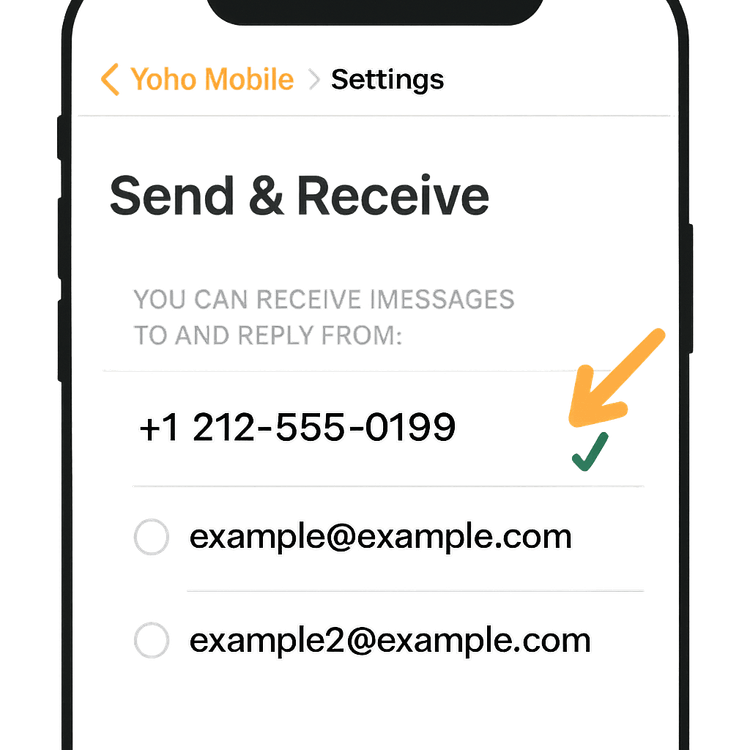
Step 1: Confirm Your Primary Number is Set for iMessage & FaceTime
First, make sure your iPhone knows that your main number is the one you want to use for messaging.
- Go to Settings > Messages > Send & Receive.
- Under the section “You can receive iMessages to and reply from,” ensure your primary phone number is checked. It’s best to uncheck any email addresses to avoid confusion.
- Next, go to Settings > FaceTime and verify the same thing—your primary number should be checked.
Step 2: Install Your Travel eSIM (Before You Go!)
Installing your eSIM before you depart is one of the best travel hacks. You can get everything set up while you’re on a reliable Wi-Fi connection and ensure it’s ready to activate the moment you land.
With Yoho Mobile, the process is incredibly smooth for iOS users. There’s no need to scan a QR code or manually enter activation details. After your purchase, simply tap the “Install” button in our app or email, and your iPhone will automatically guide you through the setup in under a minute. It’s the simplest way to get connected for your next trip to Europe or beyond.
Not sure if your phone is ready for an eSIM? Check our comprehensive eSIM compatible device list to find out.
The Ultimate Guide: Configure iMessage for Travel with an eSIM
Once you’ve landed at your destination and your eSIM is active, it’s time to configure your dual SIM settings. This is the most crucial part of the process.
Step 3: Label Your Cellular Plans
To avoid any mix-ups, give your two SIMs clear, recognizable names.
- Go to Settings > Cellular.
- Tap on your primary SIM and change its “Cellular Plan Label” to “Primary.”
- Tap on your new eSIM and label it “Travel Data.”
This simple action makes the next step much more intuitive.
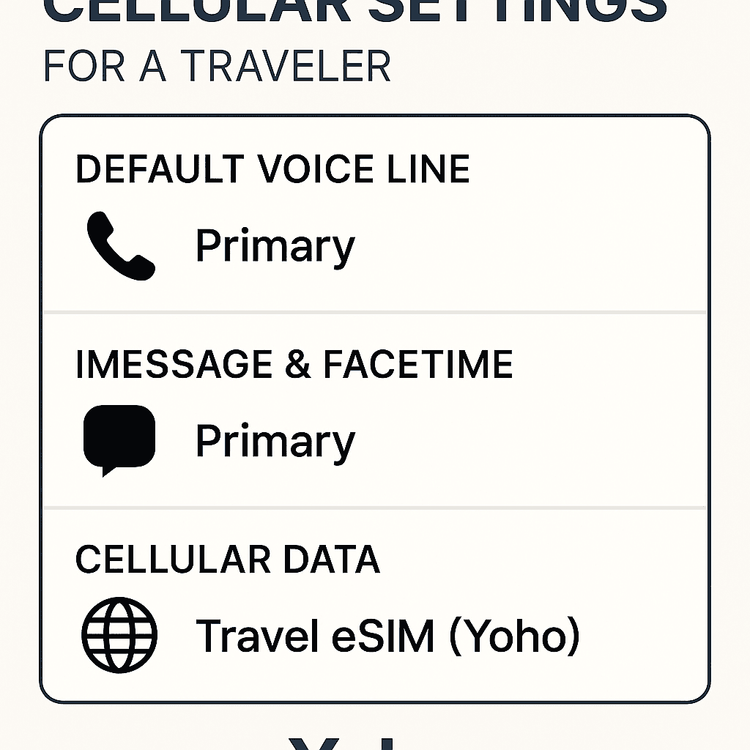
Step 4: Assign Roles to Each Line
This is where you tell your iPhone exactly how to use each line. In Settings > Cellular, you will see several options. Configure them as follows:
- Default Voice Line: Set this to Primary. This ensures that when you make a call, it defaults to your main number. It also reinforces to your iPhone that this is your main identity line, which is crucial for keeping your iMessage and FaceTime settings correct.
- iMessage & FaceTime: Your iPhone should automatically use your Default Voice Line for iMessage and FaceTime. If it prompts you to choose, always select Primary.
- Cellular Data: Set this to Travel Data. This is the most important setting for saving money, as it forces all internet activity—apps, browsing, maps—to use your affordable Yoho Mobile eSIM plan. Make sure “Allow Cellular Data Switching” is turned off to prevent your Primary SIM from accidentally using expensive roaming data.
Step 5: A Quick Check in the Messages App
To be absolutely sure, open the Messages app and start a new conversation. Just above the keyboard, you should see a small button that says “From: [Your Primary Number].” This confirms that your messages are being sent from the correct line.
What About Roaming? A Note on Your Primary SIM
To prevent any surprise bills from your home carrier, it’s essential to manage your primary SIM’s roaming settings. Go to Settings > Cellular > Primary and ensure that Data Roaming is turned Off. This will stop it from connecting to data networks abroad.
Even with the best planning, data can run low. But with Yoho Care, you’re never truly disconnected. Should you use up all your travel data, our service provides a backup connection to keep you online for essential tasks like messaging and maps, giving you total peace of mind.
Frequently Asked Questions (FAQ)
Will my contacts see my temporary eSIM number when I message them on iMessage?
No. If you follow the steps in this guide, your iMessages will continue to be sent from and show your primary phone number, just like at home. Your temporary eSIM number is only used for the data connection.
Can I still receive calls on my primary number while using the eSIM for data?
Yes, because your primary line remains active for voice and texts. However, be aware that answering calls on your primary number may incur significant roaming charges from your home carrier. For a cost-effective solution, check if your carrier supports Wi-Fi Calling, which is a great feature to use abroad.
What happens if I accidentally select my eSIM for iMessage?
Don’t worry, it’s reversible. You can switch it back by going to Settings > Messages > Send & Receive and re-selecting your primary number. You may also need to go into your Apple ID settings to de-register the temporary eSIM number.
Why is FaceTime using my eSIM number?
This issue usually arises from the same core setting. To fix it, ensure your “Default Voice Line” is set to “Primary” in Settings > Cellular, as detailed in Step 4. This tells FaceTime which number to use as its caller ID.
Conclusion
Traveling with an eSIM doesn’t have to mean sacrificing your digital identity. By taking a few moments to correctly configure your iPhone’s dual SIM settings, you can get the best of both worlds: affordable, high-speed data from your Yoho Mobile eSIM and the familiar consistency of using your primary number for iMessage and FaceTime.
By setting your primary line for voice and messages and your Yoho eSIM for data, you can navigate, post, and stream without worrying about exorbitant roaming bills or confusing your contacts.
Ready to travel smart? Don’t let communication mix-ups complicate your next adventure. Explore Yoho Mobile’s affordable and flexible eSIM plans today and stay connected, your way.
Daha Fazla Derlenmiş Seyahat İpuçları
eSIM on iPhone: A Guide for Travelers & Smart Users (2025 Edition)
Daha fazla okuTutorialsKeep Primary SIM Active with Yoho Mobile eSIM? Dual SIM Guide
Daha fazla okuTroubleshootingHow to Install and Activate Your Yoho eSIM on iPhone
Daha fazla okueSIM BasicsBenefits of eSIM: 5 Reasons Why Yoho Mobile Makes Travel Easy
Daha fazla oku