Fix 'SOS Only' on eSIM: Yoho Mobile Troubleshooting Guide 2025
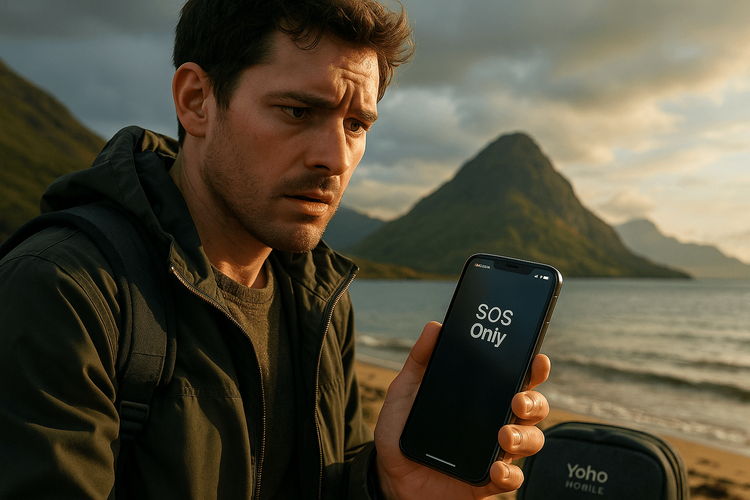
You’ve just landed in a new country, excited to explore, but your phone’s status bar shows a dreaded message: ‘SOS Only.’ It’s a frustrating experience that can leave you feeling disconnected. Don’t panic! This common issue is usually easy to fix. This guide will walk you through the essential troubleshooting steps to resolve the ‘SOS Only’ error on your Yoho Mobile eSIM for both iPhone and Android, so you can get back to enjoying your travels.
Before we dive into the fixes, are you sure you have the best data plan for your trip? With Yoho Mobile’s flexible and affordable eSIM plans, you can customize your data, country coverage, and duration, ensuring you only pay for what you need.
Why Does My Phone Say ‘SOS Only’ with an eSIM?
The ‘SOS Only’ status means your phone can’t connect to a standard cellular network for calls, texts, or data, but it can still make emergency calls. It’s a safety feature, but not helpful when you need to check Google Maps or message family. The Yoho Mobile no service SOS issue can happen for several reasons:
- Incomplete Activation: Your eSIM profile might still be activating, which can sometimes take a few minutes.
- Poor Network Coverage: You might be in an area with a weak or non-existent signal from our partner networks, like a remote national park or deep inside a building.
- Incorrect Settings: Key settings like Data Roaming or APN might not be configured correctly for your eSIM.
- eSIM Not Enabled: The cellular line for your Yoho Mobile eSIM might be turned off in your phone’s settings.
- Device Glitch: Sometimes, a simple software bug is the culprit, and a restart is all that’s needed.
Step-by-Step Guide to Fix eSIM Connection SOS
Work through these steps methodically. Your connection will likely be restored before you reach the end.
Step 1: The Quick Checks
- Toggle Airplane Mode: The simplest trick in the book. Go to your settings, turn Airplane Mode on for 30 seconds, and then turn it off. This forces your phone to re-scan for available networks.
- Restart Your Device: A full power cycle can resolve many temporary glitches. Turn your phone off, wait a minute, and turn it back on. This is a crucial step for any
iPhone eSIM SOS only fix. - Check Your Location: If you’re in a basement, elevator, or a remote area, try moving to a place with a clearer view of the sky to get a better signal.
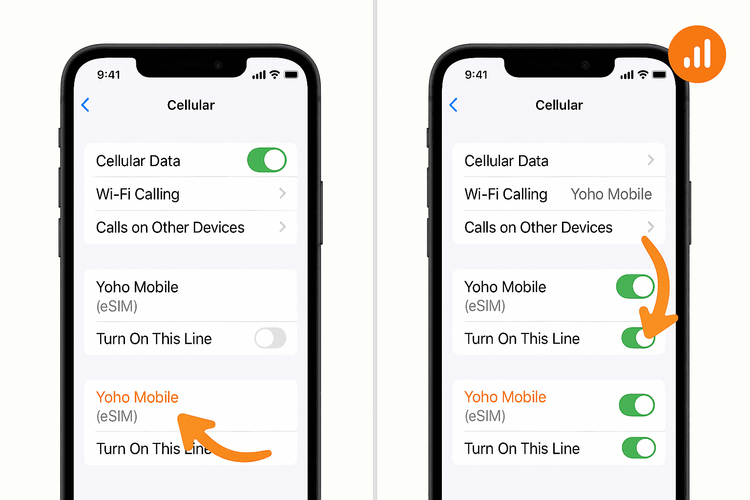
Step 2: Verify Your Yoho Mobile eSIM is Active and Selected
You need to ensure your phone is set to use the Yoho Mobile eSIM for data.
For iPhone:
- Go to Settings > Cellular.
- Check under SIMs that your Yoho Mobile eSIM is turned on.
- Tap on Cellular Data and select your Yoho Mobile eSIM.
Remember, one of the great things about Yoho Mobile on iOS is the easy setup. After purchase, you just click ‘Install’—no need to scan a QR code! If you need a refresher, check our iOS installation guide.
For Android:
- Go to Settings > Network & internet > SIMs.
- Tap on your Yoho Mobile eSIM and ensure the ‘Use SIM’ toggle is on.
- In the ‘Mobile data’ preference, select your Yoho Mobile eSIM.
Step 3: Enable Data Roaming
Your Yoho Mobile eSIM works by ‘roaming’ on local networks. Therefore, Data Roaming must be enabled for it to connect.
- iPhone: Go to Settings > Cellular > tap your Yoho Mobile eSIM > ensure Data Roaming is toggled ON.
- Android: Go to Settings > Network & internet > SIMs > tap your Yoho Mobile eSIM > ensure Roaming is toggled ON.
Don’t worry about extra charges; roaming is how your prepaid plan works and is included in your purchase. This is a common solution for many fix eSIM connection SOS problems.
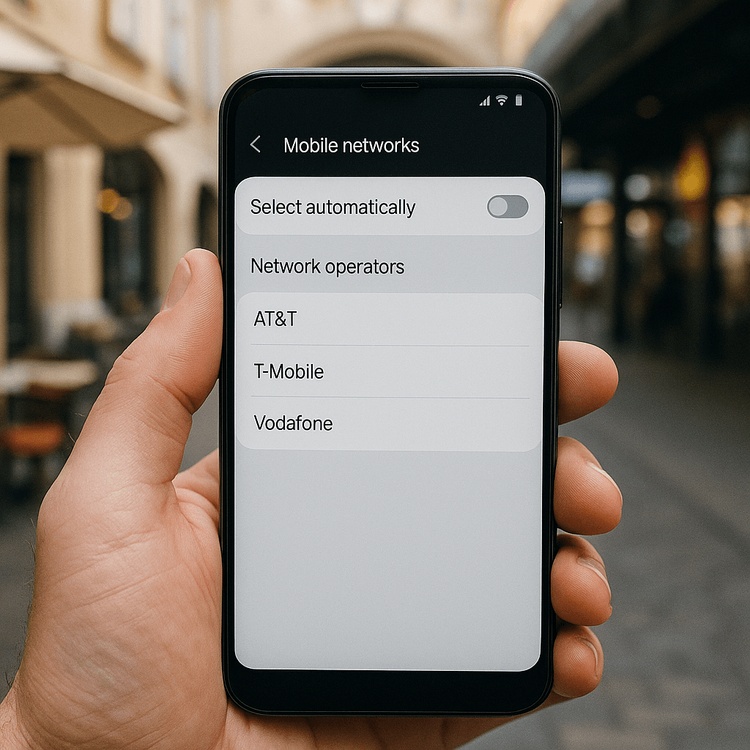
Step 4: Manually Select a Network Operator
If your phone doesn’t connect automatically, you can give it a nudge by manually selecting a supported network.
- Navigate to your phone’s cellular network settings (Settings > Cellular > Network Selection on iPhone or Settings > Network & internet > SIMs > [Your eSIM] > Automatically select network on Android).
- Turn off the ‘Automatic’ toggle.
- Your phone will scan for all available networks. This can take a couple of minutes.
- Select a different network from the list provided in your Yoho Mobile installation instructions. If the first one doesn’t work, try another from the supported list.
Still Stuck? Advanced Steps & Yoho Care
If you’ve tried everything above and still see ‘SOS Only,’ here are a couple of last resorts:
- Reset Network Settings: This will erase all saved Wi-Fi networks and Bluetooth devices but can often solve stubborn connectivity issues. On iPhone, it’s under Settings > General > Transfer or Reset iPhone > Reset > Reset Network Settings. On Android, it’s usually under System > Reset options > Reset Wi-Fi, mobile & Bluetooth.
- Contact Support: Our team is here to help. Reach out via our /contact page for assistance.
And remember, with Yoho Mobile, you’re never truly alone. Our exclusive Yoho Care service provides a safety net, ensuring that even if you encounter a technical issue or your data runs out, you won’t be left completely disconnected. It’s peace of mind for every traveler.
Frequently Asked Questions (FAQ)
What should I do if my Android eSIM shows no service but my friend’s iPhone works?
This can happen due to different device hardware or settings. For your Android eSIM SOS issue, the most effective step is often manually selecting a network operator (Step 4 above). Also, double-check that your phone model is fully compatible with eSIM technology by visiting our eSIM compatible devices list.
How long does it take for a Yoho Mobile eSIM to activate and get service?
Activation is usually instant after installation. However, it can sometimes take 5-10 minutes for your phone to register on a new network, especially after arriving in a new country. If it takes longer, start with the troubleshooting steps above.
Can I still receive calls on my primary number if my Yoho eSIM is on ‘SOS Only’?
Yes, if you have ‘Wi-Fi Calling’ enabled on your primary SIM and are connected to Wi-Fi, you may still be able to make and receive calls on that line. The ‘SOS Only’ status on your travel eSIM will not affect your primary SIM’s ability to connect to its own network (if it has service) or Wi-Fi.
Does the ‘SOS Only’ issue mean my Yoho Mobile eSIM is faulty?
It’s very rare for an eSIM profile itself to be faulty. In over 99% of cases, the ‘SOS Only’ issue is related to device settings, network coverage, or a simple registration delay. Following this guide will almost always resolve the problem.
Conclusion
Facing an ‘SOS Only’ message on your eSIM can be alarming, but it’s rarely a serious problem. By systematically checking your phone’s settings, ensuring your eSIM is active and roaming is enabled, and trying a manual network selection, you can fix the issue and restore your connection. With Yoho Mobile, you get more than just data; you get a reliable travel partner with innovative features like Yoho Care to back you up.
Ready for a worry-free travel experience? Explore Yoho Mobile’s flexible eSIM plans today and travel with the confidence of staying connected anywhere, anytime.