Visual Guide: Step-by-Step eSIM Activation for Yoho Mobile
Are you a visual learner who gets lost in long, text-heavy instruction manuals? You’re not alone. When you’re excited about your upcoming trip, the last thing you want is to decipher a complicated activation process. That’s why we’ve created this ultimate visual guide, complete with clear screenshots and step-by-step illustrations, to get your Yoho Mobile eSIM up and running in under two minutes.
Forget the confusion. Getting connected should be the easiest part of your travel prep. Ready to see how simple it is? Choose your Yoho Mobile eSIM plan now and get connected in minutes!
Before You Begin: A Quick Checklist
To ensure a seamless activation, let’s quickly run through a few prerequisites. Having these sorted will make the process completely hassle-free.
- A Stable Wi-Fi Connection: You’ll need an internet connection to download and install your eSIM profile. We recommend doing this at home or your hotel before you lose access to reliable Wi-Fi.
- An Unlocked, eSIM-Compatible Device: Your phone must be unlocked by your carrier and support eSIM technology. Not sure if your device qualifies? Check our official eSIM compatibility list to confirm.
Once you’ve ticked these boxes, you’re ready for the main event!
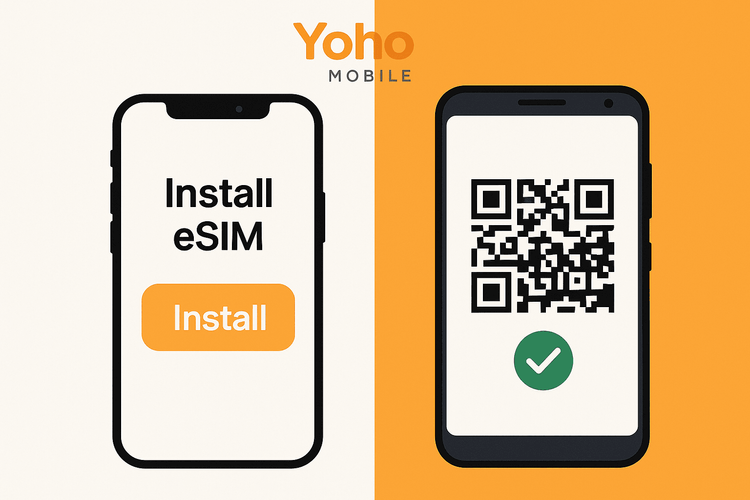
How to Install Your Yoho eSIM on iOS (iPhone): The 1-Minute Magic
For iPhone users, Yoho Mobile offers an incredibly streamlined setup. We’ve eliminated the need to fumble with QR codes or manually type in activation details. The fastest way to activate your travel eSIM is built right into our process.
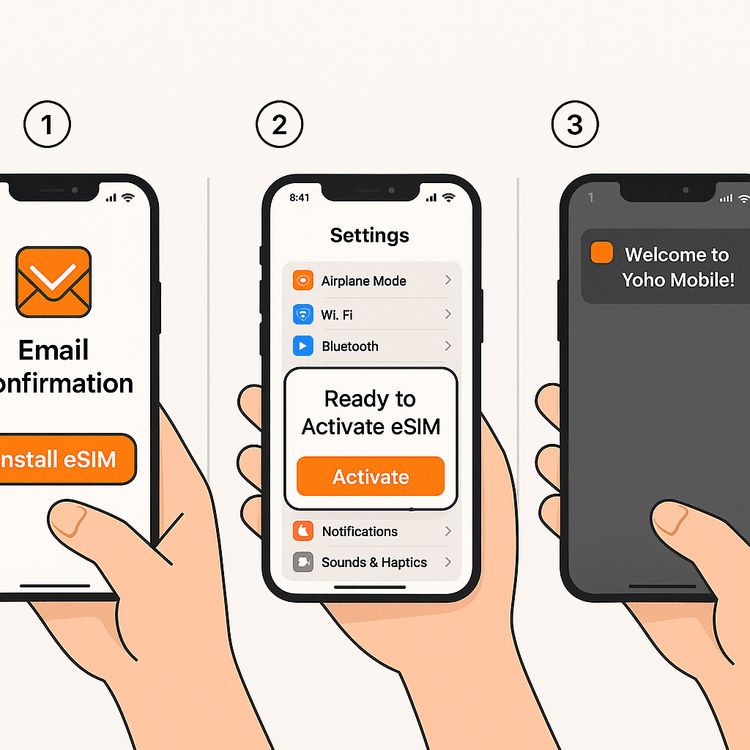
Step 1: Check Your Email
Immediately after your purchase, you will receive a confirmation email from Yoho Mobile. Open it on your iPhone.
Step 2: Tap ‘Install eSIM’
Inside the email, you’ll find a prominent button that says “Install eSIM.” Simply tap it. This is where the magic happens.
Step 3: Follow the On-Screen Prompts
Your iPhone will automatically take over, guiding you through the native iOS activation flow. You’ll just need to tap ‘Continue’ or ‘Add Cellular Plan’ a couple of times. Within a minute, your Yoho Mobile eSIM will be installed and ready to use. It’s that simple!
This revolutionary one-click method is part of our commitment to a superior user experience. For more details on eSIMs with Apple devices, you can always refer to Apple’s official support page.
How to Install Your Yoho eSIM on Android: Quick & Easy QR Scan
Setting up your Yoho Mobile eSIM on an Android device from Google, Samsung, or another manufacturer is just as straightforward. The most common method uses a QR code, which we’ll provide right after your purchase.
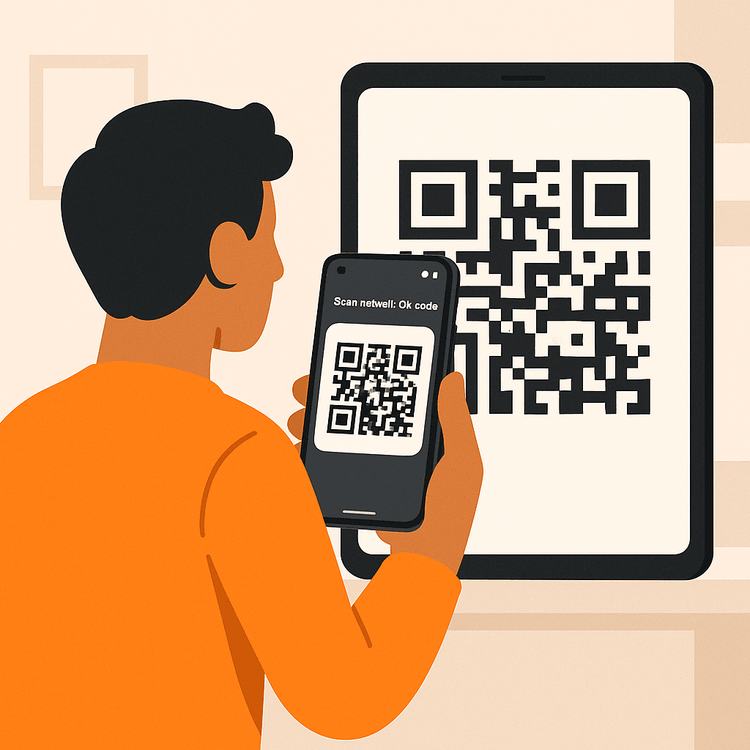
Step 1: Find Your QR Code
Your unique eSIM QR code will be in your purchase confirmation email. You can display this on another screen (like a laptop or tablet) or print it out.
Step 2: Scan the QR Code
On your Android phone, navigate to your SIM card manager:
- Settings > Network & Internet > SIMs
- Tap the ‘+’ or ‘Add eSIM’ option.
- Choose ‘Scan QR code’ and point your camera at the code.
Step 3: Manual Input (Alternative)
If for any reason you can’t scan the code, don’t worry. You can always select the ‘Enter code manually’ option. All the required details (like the SM-DP+ Address) are provided in your confirmation email. For more on Android eSIMs, check out Google’s official guide.
Post-Activation: Final Touches
Once your eSIM is installed, complete these final steps to ensure everything works perfectly when you arrive at your destination:
- Label Your eSIM: Go to your phone’s cellular settings and name your new eSIM “Yoho Travel” or something similar. This helps you easily switch between your primary and travel lines.
- Set for Data: Designate your Yoho Mobile eSIM for ‘Cellular Data’.
- Enable Data Roaming: Make sure ‘Data Roaming’ is turned ON for your Yoho Mobile eSIM. This is necessary to connect to our partner networks abroad. You will not incur extra roaming charges from us; it’s required for the service to work.
Feeling ready to travel smart? If you’re new to Yoho Mobile, why not try our service risk-free? Get our free eSIM trial and experience seamless connectivity firsthand.
Frequently Asked Questions (FAQ)
How quickly is my Yoho Mobile eSIM activated after installation?
Activation is nearly instantaneous. Once you complete the installation steps on either iOS or Android, your eSIM profile is active. It will automatically connect to a supported network as soon as you arrive in your destination country.
What should I do if my Android device fails to scan the QR code?
First, ensure your camera lens is clean and the QR code is well-lit and not damaged. If it still fails, use the ‘Enter code manually’ option. All the necessary details are in your confirmation email, providing a reliable backup for the visual guide for Android eSIM setup.
Can I install my eSIM before I travel?
Absolutely! We highly recommend you install your eSIM a day or two before you depart. This allows you to set it up while you have a stable Wi-Fi connection and contact our support team if you have any questions. The plan’s validity will only begin once it connects to a network in your destination.
What happens if I use up all my data?
Don’t panic! You can easily top up your data through your Yoho Mobile account. Plus, with our exclusive Yoho Care service, we ensure you’re never left completely disconnected, providing a backup connection to keep you online for essential needs.
Conclusion: Connectivity Made Simple
Activating your Yoho Mobile eSIM is designed to be a quick, intuitive, and stress-free experience. Whether you’re on an iPhone enjoying our one-click installation or on an Android using the simple QR code scan, you can be online in minutes. We believe that your journey should be about the destination, not about wrestling with technology.
Now that you’ve seen how easy it is, you’re ready to travel smarter. No more SIM card swaps, no more hunting for Wi-Fi. Just seamless, affordable connectivity wherever you go.
Browse our flexible eSIM data plans today and start your next adventure with confidence!
Rohkem kureeritud reisinõuandeid
How to Install and Activate Your Yoho eSIM on iPhone
Loe rohkemTroubleshootingHow to Install and Activate Your Yoho eSIM on Android
Loe rohkemTutorials“eSIM Not Working? The Only Troubleshooting Guide You’ll Ever Need
Loe rohkemTroubleshootingIs Your Phone eSIM-Ready? The Only Compatibility Guide You’ll Ever Need
Loe rohkemGet Started with YOHOWhen to Activate Yoho eSIM: Before Travel or On Arrival?
Loe rohkem